Testing with Screen Readers
A screen reader is a piece of software which announces content on the screen. It's one of a few different ways people who are blind interact with the web and technology in general.
So, how do people use the screen reader to read various pieces of content? With the keyboard.
Using the keyboard
When someone uses the Tab key to navigate a page, the focus is shifted from one item to the next which moves the keyboard cursor to each focusable element. Using Shift + Tab moves the cursor backward on the page.
Reading long content piece with no focusable items? Use Space key to move down "one page" worth of content (the height of the current viewport.) Press Shift + Space to move up the page.
Alternatively, someone can use what's called the virtual cursor which is built-in to each screen reader available. The method on how to use the virtual cursor depends on the screen reader as each has its own set of keyboard combinations and keystrokes to move around the screen.
The piece of content which gets announced is the currently focused item
One thing that I didn't realize when I first learned about accessibility development was that the piece of content which gets announced is the currently focused item.
For example, if someone were to load a site in their browser, and the first focusable item on the page was a link with the site logo, when the Tab key is activated, the keyboard focus would move to the link and the screen reader would announce the link presence via its role and accessible name; its semantic meaning.
Let's look at a few screen reader commands to help us test our user interfaces.
Common screen reader commands
The two screen reader platforms we'll focus on include:
- If you're on an Apple desktop, laptop, or mobile device, you've got a screen reader called VoiceOver right at your fingertips.
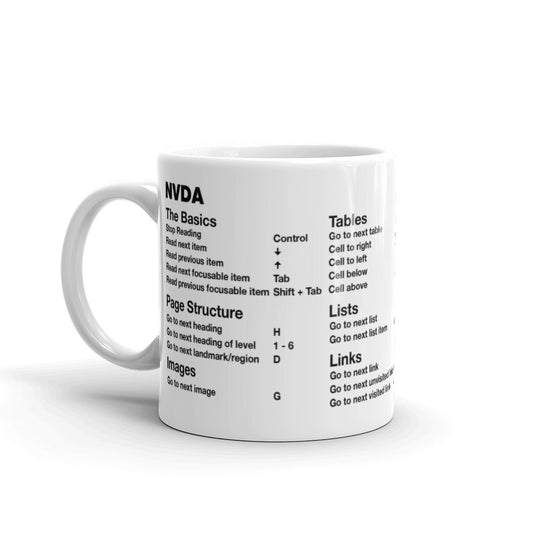
- If you're using a Windows PC, there's a free, open-source screen reader called NVDA available to install.
Let's go over common screen reader commands and methods of navigation in order to test our apps and websites.
Starting up
To start VoiceOver (VO), press the Cmd + F5 keys. VO will start reading the page or application you're currently looking at. You can Cmd + F5 again to quit out of VO.
Alternatively, if you're on a Macbook with a TouchBar, you'll need to press Cmd + Pwr three times to start VO.
Start NVDA by pressing Ctrl + Alt + N. Alternatively you can use the Windows Run dialog and enter, "nvda". One method to quit out of NVDA is to use the Run dialog again and enter "nvda -q".
You can also use the desktop icon to start and then use the Taskbar menu to turn NVDA off.
| Screen reader | Start up |
|---|---|
| VoiceOver | Cmd + F5 |
| NVDA | Ctrl + Alt + N |
Pause announcements
Most likely one of the most important keyboard commands to know when testing is how to make the screen reader temporarily stop making announcements. This seems to be the only universal truth among screen reader vendors across varying operating systems.

To pause either VO or NVDA (other screen readers, too), simply press the Ctrl key.
When you start navigating again, the screen reader voice will come back to life, happily announcing the content that you're currently interacting with.
Tabbing around
When you have either VO or NVDA enabled, use the Tab key to move in a forward direction through interactive elements on the page or Shift + Tab to move backward.
Depending on your browser settings, by default, elements on the page that you can tab to would be focusable page content; elements such as links, buttons, or form controls. Moving around in this fashion is considered using the "browser cursor." The browser cursor moves focus around from one focusable element to the next.
While this is quite handy for keyboard-only users, there is another cursor which can move to non-focusable items and describes the content on the page with greater detail, the "screen reader virtual cursor."
Screen reader virtual cursor
The virtual cursor is a feature built-in to each screen reader, desktop and mobile, which allows the user to discover and consume any type of content. Unlike the browser cursor which only stops along interactive items on the page, the virtual cursor includes these and much more. Plain text, images, headings, and anything else visible (or sometimes hidden) on the screen.
The virtual cursor is how a screen reader user consumes the content you create.
In terms of testing, the virtual cursor is a great way to test and hear how your content sounds, or if descriptive image alt text makes sense with what's being displayed in the image.
To use the VO virtual cursor, hold down Ctrl + Opt, then use the Left or Right arrow keys to move around and have VO announce all types of content on the page.
NVDA's virtual cursor is moved about by using the Up and Down arrow keys. This reads one line of content at a time.
| Screen reader | Virtual cursor |
|---|---|
| VoiceOver | Ctrl + Opt + Left or Right arrow |
| NVDA | Up or Down arrow |
Advanced navigation
Both VO and NVDA offer a way to navigate page content by grouping like elements together. Each screen reader is able to display a list or menu of like items, separated by categories, in order to quickly move around the current page and easily discover what content is available.
VO Rotor
The VO Rotor is essentially a menu of different types of elements on the page, broken down into categories. To open the Rotor, hold down Ctrl + Opt then press the U key. A new VO window will appear overtop of the page with a list of items.
When the Rotor is open and available for navigation, use the Left and Right arrow keys to move between element categories such as headings, links, landmarks, or form controls. Use the Up and Down arrow keys to navigate through the listed items. Use the Esc key to exit out from the Rotor.
NVDA Element List
NVDA also has a menu of elements on the page called the Element List. To open the list, use the Insert + F7 keys.
When the Elements List is open, use the Left and Right arrow keys to move through the types of elements. Press the Tab key to move down into the list. Once in the list, use the Up and Down keys to move through the list items.
There are many more shortcuts and keystrokes available for these screen readers, but these are just a few easy ones to learn to help you get started.
Next we'll take a look at a demo site and use VoiceOver to navigate through the page elements, searching for potential accessibility issues.
Demo!
Let's look at a before and after example of a demo site. It's important to remember: when investigating issues, always check first to see if you've used the right elements as they were meant to be used. Often, there's no need to create a complex solution to fix a problem when a more semantically structured solution will do the trick.
In the two demo sites linked below, you will notice that the example pages look the same, but the code underneath is quite different. If you were to use your mouse to navigate around and submit the form, they work perfectly well just the same. However, what happens when someone using a screen reader or the keyboard alone navigates the page and tries to fill out the form?
Listen to the following video as I use VoiceOver to navigate through the page elements. What do you notice?
It looks like the screen reader got hung up on a few things:
- When the logo link image received focus, it didn't sound like descriptive information. What was it supposed to represent?
- Did you notice the navigation links were skipped entirely? What happened there?
- Each form
inputwas announced as such, but what were they for? What type of data was expected? - The form submit
buttonseemed to have been skipped as well? How could someone submit this form using just a keyboard?
Let's address these issues and see what went wrong.
-
Logo Link
Problem: When the logo link received focus, the embedded image
altattribute text was announced. In this case, since there was noaltattribute present, the image file name was announced.Solution: This can easily be remedied by adding an appropriate image
alttext value. In this instance, it should match the text of the image itself. -
Navigation Links
Problem: When we inspect the markup for the navigation links, we see there is a custom JavaScript
onclick()event and nohrefattribute. Links without thehrefattribute will not receive keyboard focus which is why they were skipped.Solution: We can fix this quite easily by adding an
hrefattribute for each link, adding the appropriate page URL as the value, and removing the custom JavaScriptonclick()event as this is no longer required. -
Form Inputs
Problem: The form
inputelements gave no context for their intended purpose or expected data. This is a result of the inputs not having an associatedlabelto help explain the purpose of the control.Solution: We need to add a
labelelement and set itsforattribute to match the value of theidattribute of theinput. Now when the element receives focus, itslabelwill be announced. -
Submit Button
Problem: The submit
buttonwas skipped because, well, it's not abuttonat all. The element is actually aspanwith a custom JavaScriptonclick()event and CSS styles to make it appear as abutton.Solution: We can easily make this element keyboard accessible by changing the
spaninto abuttonelement. With this change, thebuttonwill be focusable and announce its role as "button," which indicates that the Space key can be used to submit the form.
After fixing these issues, let's listen to the page again and see what things sounds like.
After listening through the page again, we gain a much clearer idea of the content:
- The main logo image has an
altattribute which announces the text embedded within the image. - Each of the main navigation links are able to receive focus and are announced as a link element.
- Each form
inputis announced along with itslabel, revealing what type of content is expected. - The form submit
buttonis announced as such, receiving focus and fully supporting the keyboard interactions available to a button element (Spaceor Enter key press.)
There were also a few additional adjustments made to add even more semantic meaning to the elements on the page:
- The
header,nav, andmainHTML elements were added as wrappers for their respective content. These create "landmarks" within the page. Someone using a screen reader could now have the option to navigate by landmarks, as well as headings and links, etc, when using the VO Rotor or other shortcut keys. - A
ullist element was used to give extra context and structure to the navigation area. This helps to give notice on how many links are present when entering the list, as opposed to someone having toTabthrough each link to gain this understanding. - The main
titleof the page is now wrapped with anh1element, allowing for heading navigation and to give notice to the overall purpose of the page. Another optional attribute added to this element wastabindex. Giving this attribute a value of0adds the element to the natural browser tab order, which means this element will receive focus and be announced by the screen reader.
Testing with a screen reader (and navigating through your pages using only a keyboard) by following the browser or screen reader cursors and attempting to complete tasks with just a keyboard will tell you a lot about how accessible your UI is and whether it will make sense for people using assistive technology.
If something doesn't sound quite right or is unreachable, there are issues that need to be addressed before shipping to a production environment.
It's worth noting, screen reader compatibility isn't synonymous with full accessibility (there are a lot of other considerations for other types of users), but creating semantically structured code that's fully accessible to a keyboard goes a long way in helping both sighted and non-sighted keyboard users.
Screen reader + browser combinations
Here are the most common browser + screen reader combinations. These are the most commonly used as they have the best support regarding features and conveying information through native HTML and ARIA.
| Operating system | Browser | Screen reader |
|---|---|---|
| Windows | Internet Explorer | JAWS |
| Windows | Firefox | NVDA |
| Windows | Firefox | JAWS |
| macOS | Safari | VoiceOver |
| iOS | Safari | VoiceOver |
| Android | Chrome | TalkBack |
For more details, see the Screen Reader User Survey.
Check out "Mobile Screen Reader Testing" for tips on how to test with mobile device screen readers!
Resources:
- Using NVDA to Evaluate Web Accessibility
- Using VoiceOver to Evaluate Web Accessibility
- Screen Reader User Survey
- Google Web Fundamentals - How To Do an Accessibility Review
- Smashing Magazine: How A Screen Reader User Surfs The Web
- Semantics to Screen Readers
- Understanding screen reader interaction modes
- Sam Proulx Demo’s Reddit with NVDA